


























CUPRA Leon Front Bumper Removal Guide (2020–2024): V1, V2, VZ & Sportstourer
By Premium Components Editorial Team | Published 2 September 2026 | Updated 2 September 2026
This CUPRA Leon front bumper removal guide covers the 2020–2024 pre-facelift Leon KL, including the five-door hatchback and Sportstourer. The removal sequence is straightforward, but a correct CUPRA Leon bumper replacement starts with identifying the exact bumper family, trim package, sensor layout and front-end electronics.
Browse CUPRA Leon bumpers and headlights
Important: 2024 is a split year for the CUPRA Leon. This guide covers the original 2020–2024 pre-facelift front end; the redesigned 2024-on shark-nose bumper, grille and lighting arrangement form a separate parts family and should not be mixed with the earlier design.
CUPRA Leon pre-facelift vs facelift: front-end comparison
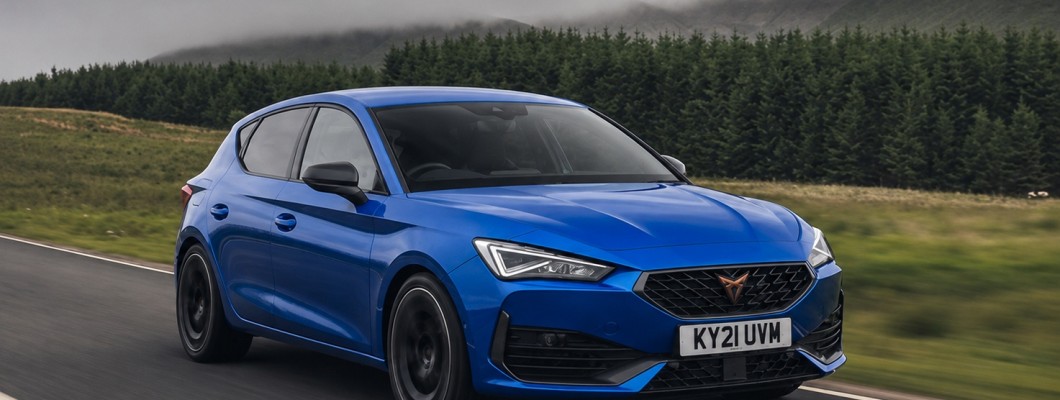
The visual difference is easiest to understand from the front. The 2020–2024 pre-facelift Leon keeps the CUPRA badge within the upper grille, while the redesigned 2024-on car moves the badge onto the bonnet and adopts a shark-nose profile, triangular headlamps and a much larger lower opening.
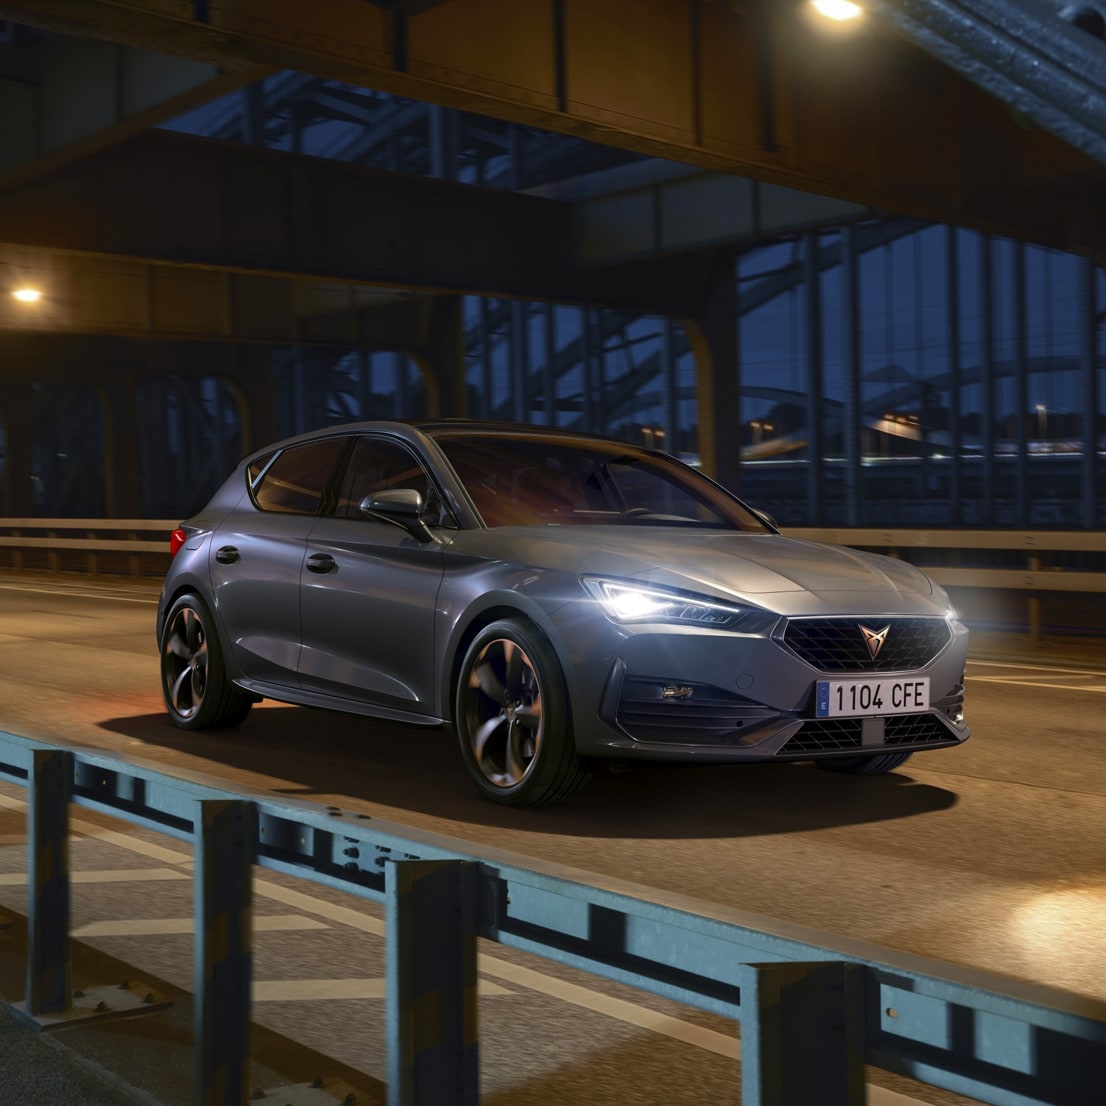
Image source: CUPRA UK.
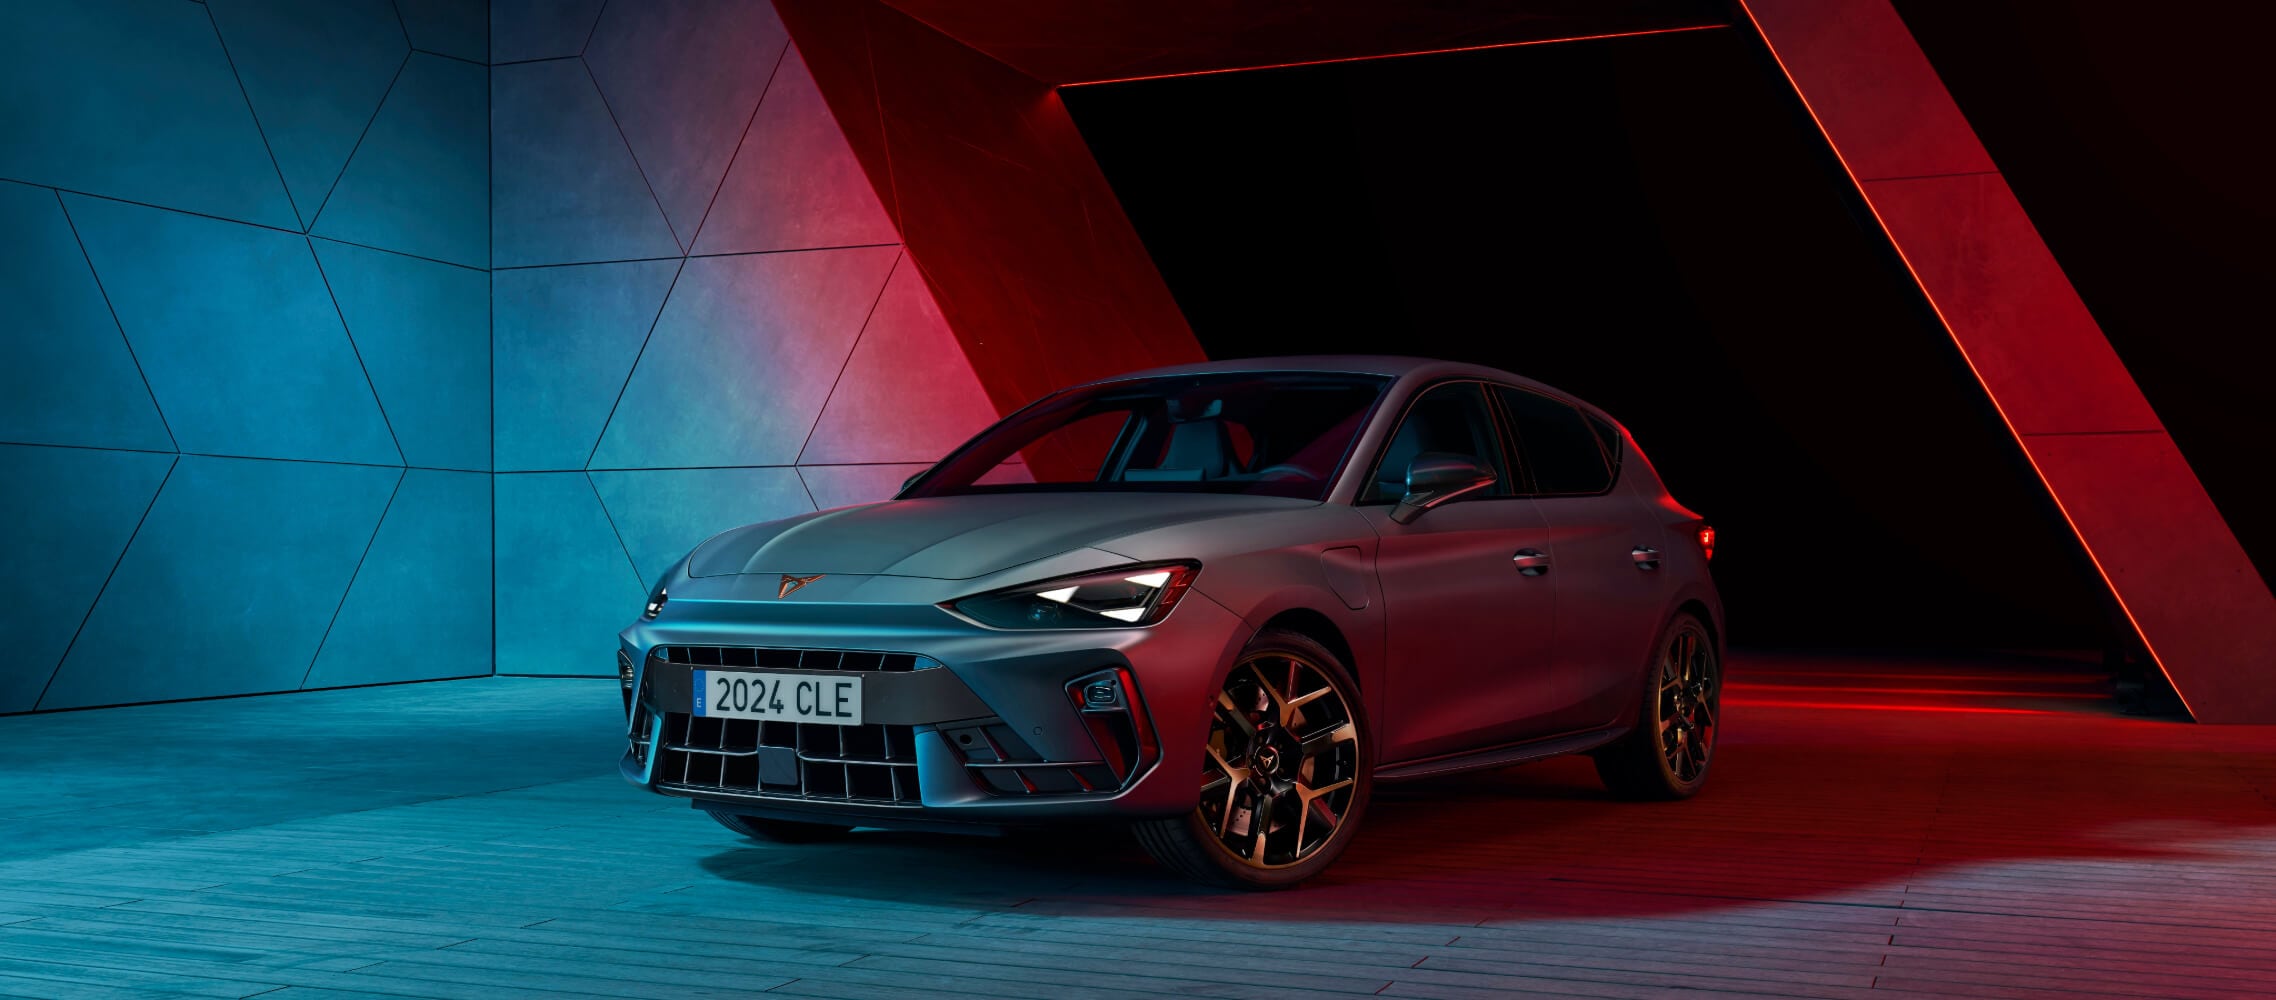
Image source: CUPRA UK.
Fitment warning: these front-end changes affect more than the painted bumper skin. The bonnet edge, upper and lower grilles, headlamp relationship, trims and supporting components must all be matched to the correct model phase.
Vehicle-specific fitment snapshot
- Generation and model code: the article covers the CUPRA Leon KL, including the five-door hatchback and Leon Sportstourer.
- Facelift: the original front end was used from 2020 into 2024. The 2024-on redesign introduced a different shark-nose profile, grille arrangement and triangular lighting treatment.
- Trim: UK CUPRA Leon grades have included V1, V2 and VZ-series versions depending on model year. SE and FR are SEAT Leon trim names, although FR can appear in shared-platform parts listings.
- Sensors, washers and ADAS: match the PDC holes and holders, washer cut-outs where fitted, central radar provision and all bumper-mounted wiring.
- Powertrain: petrol and e-HYBRID versions can use different cooling ducts, air guides or lower interfaces behind a visually similar cover.
- Body style: hatchback and Sportstourer front parts can overlap, but compatibility should still be checked using the VIN and complete OEM number.
Why the basic fit and removal is usually simple
The CUPRA Leon front bumper is normally secured along the upper radiator-support or slam-panel area, inside the front of each wheel arch, along the lower undertray edge and within the side guides beneath the headlamps.
Once these fixing zones are released, the bumper can be moved forward far enough to disconnect the parking-sensor loom, ancillary wiring and headlamp-washer hose where fitted.
The usual problems are not caused by the overall removal process. Difficulties normally come from a missed wheel-arch fixing, a damaged bumper clip, a distorted side guide or an incorrectly matched replacement assembly.
Where the differences hide
When comparing CUPRA front-end styling parts, treat the bumper as a complete assembly rather than judging compatibility from the painted cover alone.
- Pre-facelift versus facelift: the 2024-on redesign uses a different bumper, upper grille, lower grille and lighting interface. It is not a bumper-only update.
- V-grade versus VZ presentation: the shell-side mounting principle can be related while lower grilles, copper-finished details, spoilers and cooling pieces differ.
- SEAT Leon FR descriptions: some sellers use FR terminology for related 5FA parts. That description alone does not confirm complete CUPRA Leon compatibility.
- Parking-sensor provision: the number, position and angle of the PDC holders must match the vehicle.
- Outer intake sections: these are often air-curtain or decorative trim pieces rather than conventional fog-light surrounds. Match the inserts, brackets and ducts together.
- Lower interfaces: the undertray, spoiler and cooling ducts may not meet correctly even when the main painted cover appears to fit.
- Side guides: a cracked or distorted bumper retainer can leave the bumper corner sitting proud of the wing after refitting.
Model year and trim checks that matter
- Use the VIN, vehicle build date and complete label from the original bumper rather than relying only on the registration year.
- Check the bonnet line, headlamp shape and grille design to separate the original front end from the 2024-on facelift.
- Confirm the complete OEM number and suffix. Pre-facelift parts commonly use a 5FA number family, but the suffix and equipment specification remain important.
- Do not assume that an FR-labelled SEAT Leon bumper is a complete direct replacement for a CUPRA Leon.
- Count the parking sensors and compare their holder positions and angles, not only the visible holes.
- Check whether the replacement is a bare cover, partly dressed bumper or complete assembly.
- Trial-fit the bumper before paint, especially when using transferred grilles, used genuine parts or components from a different trim package.
Electronics and lighting considerations
Depending on specification, the CUPRA Leon bumper or grille area may carry parking sensors, ancillary sensors, washer plumbing, lighting connections and ADAS-related hardware.
- Keep each parking sensor in its original position and holder orientation.
- Do not strike, bend or reposition the central radar or its mounting bracket.
- Protect the lower edges of the LED or Matrix LED headlamps when releasing the bumper corners.
- Release electrical connectors by holding the connector housing rather than pulling the cable.
- Clamp or plug the headlamp-washer hose where fitted and confirm that the replacement bumper has the correct washer cut-outs.
- Check the lower grille area for an outside-temperature sensor and smaller loom clips before moving the bumper fully clear.
- Do not switch the ignition on while parking sensors or other bumper-mounted components are disconnected.
Normal bumper-cover removal does not require contact with the e-HYBRID high-voltage system. Stop work if accident damage exposes orange high-voltage cables, damaged cooling hardware or unfamiliar electrical components.
What usually transfers
| Component | Reusable | Notes |
|---|---|---|
| Parking sensors | Usually | Only where the replacement has the matching layout and correctly angled holders. |
| Bumper wiring loom | Usually | Inspect connector locks, insulation and every loom-retaining clip. |
| Centre and lower grilles | Sometimes | These are facelift-, cover- and trim-specific. |
| Outer intake trims | Sometimes | Match the surface finish, mounting tabs and related air guides. |
| Washer jets and caps | Usually | The replacement cover must have matching washer apertures and brackets. |
| Impact absorber foam | If undamaged | Do not reuse foam that is crushed, split or permanently distorted. |
| Side guides and retainers | Sometimes | Replace cracked or distorted guides instead of forcing the corner into place. |
| Undertray and air guides | Sometimes | Powertrain and lower-trim differences can change the interfaces behind the cover. |
| ACC radar and bracket | Normally stays with the vehicle | Do not transfer or reposition it casually; calibration may be required if disturbed. |
Building the right parts and tools list
Parts and consumables
- Correct 2020–2024 pre-facelift bumper cover, confirmed using the VIN and complete OEM number
- Compatible centre grille, lower grille, outer intake trims, spoiler and air guides
- Spare bumper clips, wheel-arch fasteners, push rivets and Torx screws
- Replacement side guides, PDC holders, washer caps or tow-eye cover where required
- Masking tape to protect the wing and headlamp edges
- A suitable plug or clamp for the washer hose
- A clean blanket, foam sheet or padded work surface for the removed bumper
Tools
- T25 and T30 Torx bits
- Small socket set, commonly including 8 mm and 10 mm sizes
- 1/4-inch ratchet with a short extension
- Plastic trim-removal tools and trim-clip pliers
- Small pick or terminal tool for electrical connector locks
- Jack and axle stands or ramps where safe lower access is required
- Labelled containers for separating upper, lower and wheel-arch fixings
- Diagnostic scanner for checking stored faults after refitting where necessary
Step-by-step: how to remove a CUPRA Leon front bumper
Step 1 — Identify the correct bumper family
Before dismantling the car, confirm that it has the 2020–2024 pre-facelift front end rather than the redesigned 2024-on bumper. Record the original bumper label, PDC layout, washer caps, lower grilles and outer trims.
Compare the complete rear face of the replacement with the original. Check the sensor-holder positions, grille ledges, lower spoiler, tow-eye cover and every mounting tab before the vehicle is taken apart.
Step 2 — Prepare and protect the vehicle
Park the Leon on level ground, select Park or first gear, apply the parking brake and switch off the ignition. Keep the key away from the vehicle so that electrical systems are not unintentionally activated.
Turn the steering to provide access to one wheel arch at a time. Alternatively, remove the front wheels if the vehicle is safely supported at the correct lifting points using suitable axle stands.
Apply masking tape to the leading edges of the wings and headlamps to reduce the chance of scratching the paint while the bumper corners are released.
Step 3 — Remove the upper fixings
Open the bonnet and remove the upper plastic radiator-support or slam-panel cover where fitted. Undo the Torx screws and clips securing the upper bumper or grille flange.
Place the fixings in a labelled container. Their length and head design may differ from the fasteners used in the wheel arches and undertray.
Step 4 — Free the wheel arch liner and side fixing
Remove the screws and clips securing the front section of the wheel arch liner. Pull the liner back carefully and locate the hidden bumper-to-wing fixing and side retainer.
Repeat the procedure on the opposite side. Do not pull either bumper corner away from the wing until both sides have been fully checked.
Step 5 — Release the undertray and lower bumper edge
Working underneath the front edge, remove the screws and clips joining the bumper to the undertray, lower spoiler and air guides.
The exact number and position of lower fixings can vary with specification and previous repair history. Check the complete lower edge and confirm that it moves independently before pulling the bumper forward.
Step 6 — Release the bumper corners
Support one bumper corner with your hand and pull it gently outward from the front wing, then slightly forward. The mounting tabs need to slide out of the side guide rather than being bent downwards.
Do not lever against the painted wing or headlamp. If the corner remains firmly attached, stop and check again for a hidden fastener behind the wheel arch liner.
Step 7 — Move the bumper forward and disconnect the services
With assistance from a second person, move the bumper forward by approximately 10–15 cm. Do not attempt to carry it away until every connector and hose has been released.
Depending on specification, disconnect:
- The main parking-sensor wiring loom
- Outside-temperature or ancillary sensor connectors
- Bumper-mounted lighting connections where fitted
- The headlamp-washer hose
- Any additional loom clips linking the bumper to the front panel
Release each electrical connector using its locking tab. Plug or clamp the washer hose immediately to prevent fluid from draining.
Step 8 — Remove the bumper and inspect the mounting system
Once all services are disconnected, lift the bumper clear and place it on a padded surface.
Inspect the side guides, impact absorber, lower air guides, undertray mounting points, radar bracket and wiring loom. A replacement bumper will not align correctly if a distorted support or damaged retainer remains in place.
Transfer parking sensors one position at a time and copy the original loom route. Trial-fit the replacement before painting, especially when using a used genuine bumper or fitting transferred trim and grille parts.
Reinstallation instructions
- Confirm that all parking sensors, grilles, trims, air guides, washer components and wiring clips are fully seated.
- Reconnect the wiring and washer hose while the bumper is supported a short distance in front of the vehicle.
- Check that no wiring, hose or air guide is trapped between the bumper, absorber and front panel.
- Offer the centre of the bumper into position before guiding both corners evenly into their side retainers.
- Fit the upper, wheel-arch and lower screws loosely without fully tightening them.
- Align the bumper against the wings, headlamps, bonnet edge, grille and lower undertray.
- Compare the gaps on both sides before tightening the fixings to the vehicle-specific workshop specification.
- Replace any bumper clip or wheel-arch fastener that no longer holds securely.
- Test the parking sensors, lighting and headlamp washers where fitted.
- Check for stored faults and arrange an ADAS inspection or calibration if the radar, its bracket or surrounding front structure was moved or damaged.
Common pitfalls and how to avoid them
- Buying by registration year alone: 2024 includes both the original and redesigned front ends, so use the VIN and bumper label.
- Ordering by an FR description: SEAT Leon terminology in a parts listing does not prove complete CUPRA Leon fitment.
- Buying only the painted cover: budget for the correct grilles, trims, sensor holders, spoiler and air guides.
- Missing the wheel-arch fixing: pulling the corner while it is still secured can crack a bumper tab or side guide.
- Painting before trial-fitting: confirm the shell, trims, sensor layout and lower interfaces before paying for paintwork.
- Mixing parking-sensor holders: an incorrect holder angle can cause unreliable PDC operation even when the sensor itself is undamaged.
- Ignoring damaged side guides: a bumper can fit in the centre while one corner remains proud of the wing.
- Overlooking ADAS checks: a visually aligned bumper does not prove that a disturbed radar or bracket remains within specification.
Before ordering paint or beginning a trim conversion, review more installation guides and compare the complete replacement assembly with the original bumper.
Costs, time and effort
- Bumper removal only: approximately 60–90 minutes for a careful first attempt.
- Component transfer and refitting: approximately 2–4 hours depending on the PDC, washer and trim package.
- Used genuine bumper cover: commonly around £225–£400 depending on condition and the components included.
- More complete bumper assembly: commonly around £450–£900 or more when grilles, spoilers, sensors and trim are included.
- Paint preparation and refinishing: commonly around £250–£500 in the UK, depending on finish, existing damage and local labour rates.
- Bodyshop removal and refitting: often around £150–£350 before the cost of parts, paintwork or diagnostics.
- ADAS radar calibration: allow approximately £160–£300 or more when the radar or its mounting has been disturbed.
DIY difficulty: moderate. The physical CUPRA Leon bumper removal is manageable for a competent DIY mechanic, but correctly identifying and rebuilding the bumper specification is more important than the number of screws involved.
The stated figures are practical UK estimates rather than fixed quotations. Paint costs, labour rates and calibration charges vary between workshops.
Frequently asked questions
Does this guide cover the 2024-on facelift CUPRA Leon?
No. It focuses on the 2020–2024 pre-facelift front end. The 2024-on redesign uses a shark-nose profile, revised grille and triangular lighting treatment, so its bumper and attached parts should be treated separately.
Are SE and FR CUPRA Leon trim levels?
No. SE and FR are SEAT Leon trim names. UK CUPRA Leon grades have used V1, V2 and VZ-series naming depending on model year. FR can still appear in shared-platform parts listings, so fitment must be confirmed independently.
Will a SEAT Leon FR bumper fit a CUPRA Leon?
Do not assume that it will fit as a complete assembly. Some core parts can share an engineering family, but the grilles, outer trims, spoiler, sensor provision and cooling pieces may differ. Compare complete part numbers and both bumpers from the rear.
Can the original parking sensors be reused?
Usually, provided that the replacement has the same sensor layout and compatible holders. Keep each sensor in its original position and orientation during the transfer.
Is the front bumper the same on the hatchback and Sportstourer?
Some pre-facelift front parts are catalogued across both body styles, but body style alone does not prove compatibility. Confirm the VIN, complete OEM number, suffix and equipment configuration.
Does the radar need calibration after bumper removal?
Not simply because the painted cover was removed. Calibration may be required if the radar, bracket or surrounding front-end geometry was moved, replaced or affected by collision damage.
Can I drive the car with the front bumper removed?
This is not recommended. Number-plate mounting, lighting, pedestrian protection, exposed wiring, underbody protection and roadworthiness can be affected. Complete the repair and test all systems before returning the vehicle to normal road use.
Final thoughts
A CUPRA Leon bumper removal is manageable once the vehicle has been correctly identified as a 2020–2024 pre-facelift car and its trim, body style, sensor layout and lower components have been recorded.
Taking a few minutes to photograph the original part label, PDC arrangement, grilles, spoiler and wiring can prevent an expensive fitment mistake.
For current CUPRA Leon bumper and headlight stock, compare the listing photographs, trim specification, sensor layout and visible part-number label before ordering.
Leave a Comment