This VW Golf Sportsvan front bumper removal guide covers the 2014–2020 Sportsvan and explains how to remove, replace and refit the front bumper correctly. The main fitment issue is the 2017/2018 facelift, which brought redesigned bumpers and headlights, so pre-facelift and facelift covers should not be treated as interchangeable without checking the complete specification.
Important: the Golf Sportsvan was produced from 2014 to 2020, but Volkswagen introduced a substantial exterior update for the model in 2017, including redesigned bumpers and headlights. A 2017 registration therefore does not, by itself, tell you which bumper you need. Always check the actual front-end design, VIN and OEM part number before ordering a replacement.
VW Golf Sportsvan pre-facelift vs. facelift: front-end comparison
The easiest way to identify the correct VW Golf Sportsvan front bumper is to compare the vehicle's front end. The original Sportsvan uses the earlier Golf-family design, while the updated model received revised bumpers and headlights as part of Volkswagen's 2017 update.
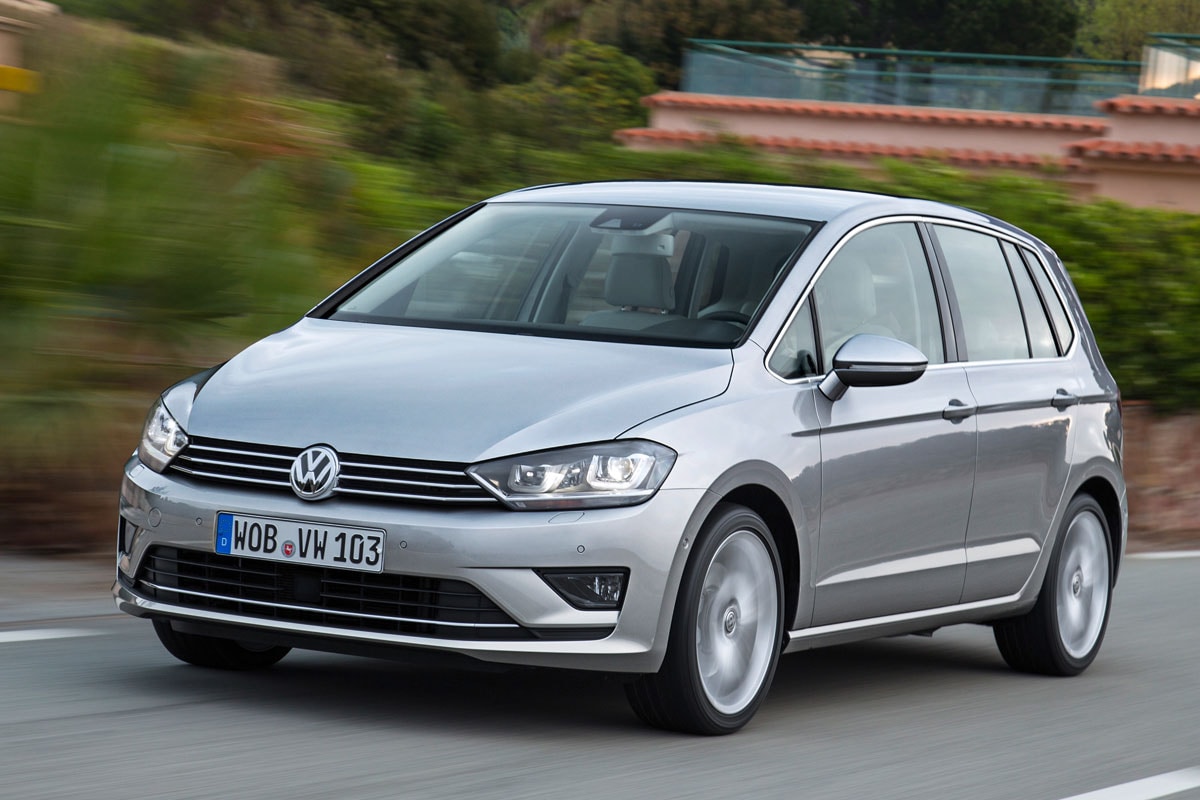
2014–2017 pre-facelift: the original Sportsvan front end uses the earlier grille, headlamp and bumper design.
Image source: AutoWeek.
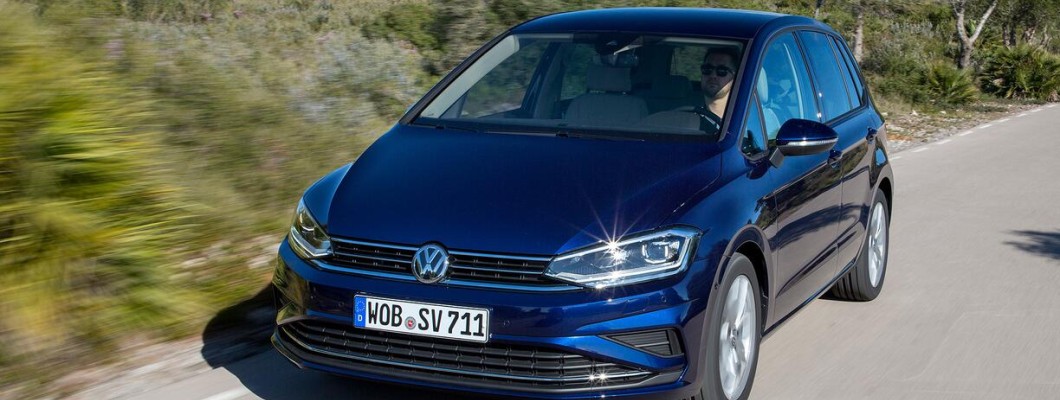
2017/2018–2020 facelift: revised bumper and headlamp design introduced with Volkswagen's Sportsvan update.
Image source: Auto Motor und Sport.
Fitment warning: the facelift changed more than the appearance of the painted bumper. Volkswagen specifically introduced redesigned bumpers and headlights as part of the update, so the grille, lower inserts, headlamp relationship and associated trim must all be checked before assuming compatibility.
Vehicle-specific fitment snapshot
Model: Volkswagen Golf Sportsvan, also commonly called Golf SV in the UK market and sometimes incorrectly described as Golf Plus in parts listings.
Generation: Golf Sportsvan 2014–2020, derived from the Golf Mk7 family.
Pre-facelift: approximately 2014–2017.
Facelift: introduced from 2017/2018 and continuing through the end of Sportsvan production in 2020.
Trim: depending on market and model year, Sportsvan cars can be described using Trendline, Comfortline, Highline, S, SE and other special-edition naming.
R-Line: R-Line Sportsvan cars use trim-specific exterior components and should not be assumed to share every grille or lower insert with standard cars.
Equipment: check PDC/Park Assist, headlamp washers, fog-light or DRL openings, front-assistance equipment and the exact grille arrangement.
Body style: Sportsvan is a distinct body style from the Golf hatchback, Golf Variant and Golf Plus. A standard Golf Mk7 bumper should not be assumed to fit a Sportsvan.
Why the basic fit and removal is usually simple
The basic VW Golf Sportsvan bumper removal follows a familiar Volkswagen front-end layout. Once the upper grille fasteners and clips, lower bumper fixings, wheel-arch screws and side retainers have been released, the bumper can be pulled forward from its guide points.
One published Sportsvan removal sequence identifies two upper grille bolts, additional grille clips, eight lower bumper bolts, three or four wheel-arch fasteners per side, and an upward-facing bumper-corner bolt on each side. Treat these counts as a guide rather than a definitive fastener map: equipment, production differences and previous repairs can affect the exact arrangement. Once the fixings are removed, release the bumper from its wing-side clips before disconnecting the electrical connectors and washer hoses.
The job is more about following the correct sequence than using specialist equipment. Common mistakes include pulling a corner while a hidden fastener is still fitted, cracking a grille clip or allowing the bumper to hang from its wiring.
Pre-facelift versus facelift: the 2017/2018 update introduced redesigned bumpers and headlights.
Standard versus R-Line: R-Line versions use different lower bumper styling, grilles, inserts and decorative pieces.
PDC: sensor number and position must match the replacement bumper and holder layout.
Park Assist: cars fitted with additional parking assistance can require more sensor positions than a basic PDC-equipped car.
Headlamp washers: washer-equipped bumpers need the correct openings, brackets, jets and caps.
Fog lights and DRL areas: the lower outer openings vary with equipment and model year.
Undertray interface: the bumper's lower edge and air-guide connection must match the car.
Side guides: worn or broken guides are a common reason for a bumper corner sitting proud of the wing after refitting.
Model year and trim checks that matter
Do not use registration year alone: 2017 is particularly important because it sits around the Sportsvan's major exterior update.
Check the front-end design: compare the headlamps, grille and bumper before ordering.
Check the complete OEM number: Sportsvan bumper numbers commonly use the 510 807 221 family, but the complete suffix is required for reliable identification.
Check the advertised fitment range: some parts listings use overlapping or broader year ranges around the facelift. Treat these dates as a guide only and verify the VIN, physical front end and complete OEM part number together.
Check R-Line parts separately: the bumper skin may look similar while the attached grilles and lower inserts are different.
Check what is included: a bare bumper can require the grille, lower inserts, sensor holders, washer caps and brackets to be transferred from the original.
Trial-fit before paint: check the wings, headlamps, grille and undertray connection before paying for refinishing.
Electronics and lighting considerations
Parking sensors: transfer the sensors with the correct holders and seals and retain their original positions.
Park Assist: do not drill additional PDC holes by eye. The holder position and angle matter to the system.
Fog lights: disconnect the wiring after the bumper is moved forward enough to reach the connector locks.
Headlamp washers: clamp or plug the washer hose before completely removing the bumper to prevent fluid loss.
Front Assist / radar: avoid striking or repositioning radar equipment and its bracket. If the radar or surrounding structure has moved, a diagnostic inspection or calibration may be required.
Headlamps: protect the lower edges while the bumper is being released from the side guides.
Temperature and ancillary sensors: inspect the lower grille area for smaller sensors and clipped wiring before carrying the bumper away.
Switch the ignition fully off, keep the key away from the vehicle and do not switch the ignition on while bumper-mounted electrical components are disconnected. Routine PDC connector removal does not automatically require battery disconnection on every Sportsvan; follow vehicle-specific Volkswagen workshop procedures where ADAS or collision damage is involved.
What usually transfers
Component
Reusable
Notes
Parking sensors
Usually
Keep each sensor with the correct holder and original position.
PDC / Park Assist loom
Usually
The replacement bumper must have the same sensor layout and retaining points.
Radiator grille
Only within the matching bumper family
Pre-facelift and facelift grille assemblies differ.
Lower grille inserts
Only with matching bumper family
R-Line and standard parts can use different shapes and clips.
Fog lamps / lamp surrounds
Sometimes
Match the exact lower-opening design and mounting brackets.
Headlamp washer jets and caps
Usually if fitted
The replacement bumper must have matching washer cut-outs and supports.
Tow-eye cover
Only with matching cover
Shape and finish can vary between bumper families.
Side guides / retainers
Sometimes
Replace damaged guides rather than forcing the bumper into position.
Impact absorber foam
If undamaged
Inspect after collision damage before reusing.
Undertray / air guides
Sometimes
Check engine, trim and facelift-specific interfaces.
Correct Sportsvan front bumper for the model phase and trim
Matching radiator grille and lower grille inserts
Compatible PDC sensor holders and seals
Fog-light or DRL surrounds where fitted
Headlamp washer caps and brackets where fitted
Replacement bumper clips, screws and wheel-arch fasteners
Side guides if the existing ones are cracked or distorted
Masking tape and a padded blanket for the removed bumper
Washer-fluid hose plug or clamp where the vehicle has headlamp washers
Tools
T25 and T30 Torx bits
8 mm and 10 mm sockets
Ratchet with extension
Plastic trim-removal tools
Flat-blade screwdriver
Trim-clip pliers where available
Jack and axle stands or ramps if additional lower access is required
Labelled tray for separating upper, wheel-arch and lower fasteners
Step-by-step: how to remove the VW Golf Sportsvan front bumper
Step 1 — Confirm the correct bumper and model phase
Before dismantling the vehicle, establish whether it is the pre-facelift or facelift Sportsvan. Compare the headlamps, grille and bumper shape, then record the bumper's OEM label and any visible part number.
Compare the replacement bumper with the original from both the front and rear. Check the PDC holes, washer openings, grille ledges, lower inserts and every mounting tab before taking the car apart.
Step 2 — Prepare and protect the vehicle
Park on level ground, apply the parking brake and switch the ignition fully off. Keep the key away from the vehicle while bumper wiring is disconnected.
Turn the front wheels outward for access to the wheel-arch fasteners, or remove the front wheels if the vehicle is safely supported at the correct lifting points on suitable axle stands. Apply masking tape to the leading edges of the wings and headlamps.
Step 3 — Remove the upper radiator grille
Open the bonnet and remove the two upper grille bolts where fitted. Release the upper retaining clips through their access points using a suitable screwdriver or plastic trim tool.
Pull the grille forward evenly. Avoid twisting one side excessively, as the grille frame and retaining tabs can crack.
Step 4 — Remove the lower bumper fasteners
Move underneath the front of the car and remove the fasteners running along the lower bumper and undertray connection. Some Sportsvan removal instructions identify eight lower bolts on the original bumper assembly, but the exact number and type of fasteners can vary with specification and previous repair work.
Keep different-length fasteners separated and check the entire lower edge before attempting to move the bumper.
This Sportsvan-specific diagram highlights the bumper assembly and key fastening points. Use it as a visual reference, and confirm the exact fixings on your vehicle. Image source: Remont-Bampera's Golf Sportsvan bumper-removal guide.
Step 5 — Remove the wheel-arch liner fasteners
Turn the steering for access to one side. Remove the front section of the wheel-arch liner, typically using three or four fasteners per side depending on the particular car.
Pull the liner back far enough to expose the bumper-to-wing bolt at the corner.
Step 6 — Remove the hidden bumper-corner bolts
Remove the upward-facing bolt securing each bumper corner to the wing-side area. Check carefully for additional screws added during previous repairs.
Step 7 — Release the bumper from the side guides
Support one corner and pull it gently outward from the wing before moving it forward. The bumper tabs should disengage from the side guides without excessive force.
Repeat on the other side. If a corner refuses to move, stop and check again for a missed fastener rather than forcing the plastic.
Step 8 — Release the upper bumper clips
Once the side fasteners are free, release the remaining upper locating clips beneath the grille area. Work progressively across the bumper rather than pulling one section a long way away from the car.
Step 9 — Move the bumper forward and disconnect wiring
With a helper supporting the opposite side, move the bumper forward just far enough to reach the electrical connections.
Depending on equipment, disconnect:
PDC or Park Assist wiring
Fog-light connectors
Daytime-running-light or auxiliary lighting connectors where fitted
Headlamp-washer hose
Outside-temperature or other ancillary sensor connections
Any remaining loom clips attaching the bumper to the front panel
Release electrical connectors from the housing and do not pull on the wires. Plug or clamp the washer hose before the bumper is carried away.
An example of a Golf Sportsvan with its front bumper removed. Connector positions and equipment can vary, so check your own vehicle before disconnecting anything. Image source: OLX vehicle listing. Confirm permission to reuse this listing photo before publishing.
Step 10 — Remove the bumper and inspect everything
Carry the bumper to a padded surface. Inspect the side guides, impact-absorber foam, lower air guides, grille mounts, sensor holders and wiring before transferring any components to the replacement.
Transfer components one at a time and copy the original loom routing. Trial-fit the replacement bumper before painting.
How to reinstall the VW Golf Sportsvan front bumper
Confirm the correct grille, lower inserts, PDC holders, washer components and trim pieces are fitted to the replacement bumper.
Bring the bumper to the car with a helper and reconnect all electrical connectors and washer hoses before pushing the cover fully home.
Check that no wiring or hose is trapped behind the bumper.
Engage both corners into their side guides evenly.
Fit the upper, wheel-arch and lower fasteners loosely so the bumper can still be aligned.
Check the bonnet, headlamp and wing gaps on both sides.
Tighten the fasteners using the vehicle-specific Volkswagen torque specifications where available.
Refit the radiator grille and any removed upper covers or clips.
Test parking sensors, Park Assist, fog lamps, washers and any front-assistance warnings before road use.
If radar or its bracket has been moved or damaged, arrange the appropriate diagnostic inspection or calibration.
Reference view of a complete Golf Sportsvan front end. After refitting, check the bumper-to-wing and bumper-to-headlamp gaps against your own vehicle. Photo: M 93 / Wikimedia Commons, licensed under CC BY-SA 3.0 DE.
Common pitfalls and how to avoid them
Confusing pre-facelift and facelift Sportsvan: 2017/2018 is the important model-change period.
Buying by registration year alone: check the actual front-end design and OEM number.
Using a standard Golf bumper: Sportsvan is a distinct body style and its bumper should not be assumed to fit a Golf hatchback or Golf Variant.
Assuming the painted cover is the complete bumper: grilles, holders, surrounds and brackets may need to be transferred.
Missing the upper grille clips: forcing the grille or bumper can break the retaining tabs.
Pulling the bumper before removing the corner bolt: this can damage the side guide or bumper mounting tab.
Letting the bumper hang from its wiring: support the cover and disconnect everything before carrying it away.
Painting before trial fit: check all panel gaps and lower interfaces first.
Mixing PDC configurations: match the sensor count, holder type and positions exactly.
Bumper removal: approximately 60–90 minutes for a careful DIY first attempt.
Parts transfer and complete refit: approximately 2–4 hours depending on trim, PDC and washer equipment.
Used genuine Sportsvan bumper: commonly around £180–£350 depending on model phase, condition and included components.
More complete bumper assembly: around £300–£650 or more when grilles, sensor holders and trim pieces are included.
Paintwork: approximately £250–£500 in the UK depending on colour and preparation required.
Bodyshop removal and refitting: commonly around £120–£300 before paint, parts or diagnostics.
ADAS/radar calibration: allow approximately £150–£300 or more where the radar or its mounting has been disturbed.
DIY difficulty: moderate. The bumper itself is straightforward to remove, but getting the correct pre-facelift or facelift cover and transferring the correct grille, sensor and washer equipment is where most of the fitment risk lies.
These are practical UK estimates rather than fixed quotations. The condition and completeness of a used bumper can make a significant difference to the final repair cost.
Frequently asked questions
Can I remove a VW Golf Sportsvan front bumper myself?
Yes. A competent DIY mechanic with Torx bits, sockets and plastic trim tools can normally remove the bumper without specialist equipment. A second person is useful when the cover is being carried away from the car.
What years does this VW Golf Sportsvan bumper guide cover?
This guide covers Sportsvan models from 2014 to 2020, including both the original pre-facelift front end and the revised 2017/2018-on facelift.
Is the 2017 VW Golf Sportsvan a facelift?
Volkswagen introduced the updated Sportsvan in 2017, with redesigned bumpers, new headlight options and other exterior changes. Check the actual car rather than relying only on registration year.
Will a Golf Mk7 bumper fit a Golf Sportsvan?
No assumption should be made based on the Golf Mk7 name alone. The Sportsvan is a distinct body style and its bumper shape and mounting arrangement must be matched specifically to the Sportsvan.
Can I fit a facelift bumper to a pre-facelift Sportsvan?
Do not treat it as a simple bumper-swap exercise. The facelift changed the bumper and headlight design, so the complete front-end interfaces and supporting components need to be checked before attempting a conversion.
Can I reuse the parking sensors?
Usually, provided the replacement bumper has the same PDC layout and compatible holders. Keep each sensor in its original position and orientation.
Can I replace the grille without removing the bumper?
The upper grille is released as part of the bumper-removal sequence, and removing the bumper generally gives safer access to the retaining clips. Avoid forcing grille tabs from the front because they can crack.
Do headlamp washers change which bumper I need?
Yes. A bumper for a washer-equipped car needs the correct washer apertures and internal supports. Check this before buying or painting a replacement.
Final thoughts
A successful VW Golf Sportsvan front bumper replacement starts with identifying the correct model phase. Treat the 2014–2017 and 2017/2018–2020 front ends as separate bumper families because Volkswagen changed the bumper and headlight design as part of the Sportsvan update.
Once the correct bumper has been identified, removal is methodical: release the upper grille, remove the lower and wheel-arch fasteners, disengage the side guides, support the cover, then disconnect its electrical equipment and washer hose.





























Leave a Comment